

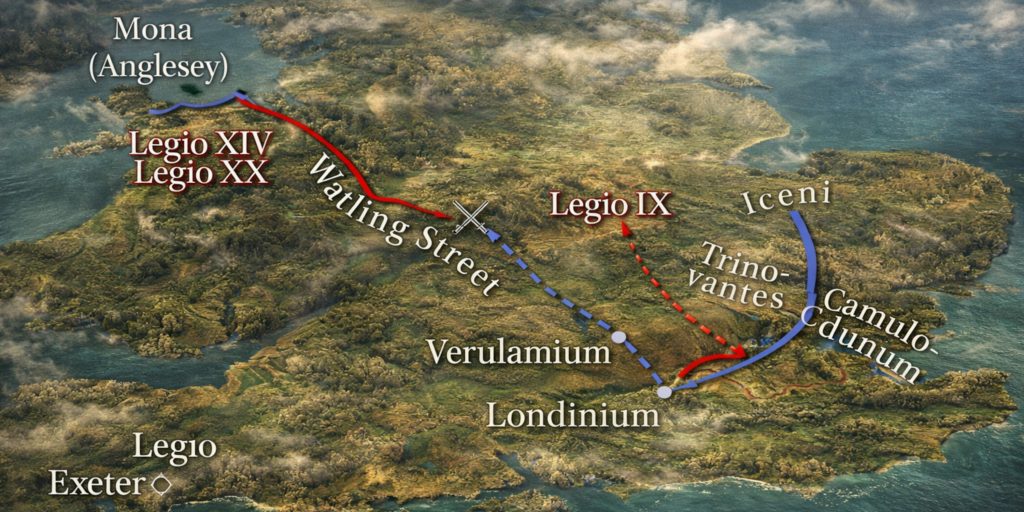
The Battle of Watling Street was the brutal conclusion to Boudicca’s revolt against Roman rule in Britain. Fought in AD 60 or 61, somewhere along the long Roman road later known as Watling Street, it ended one of the most dangerous uprisings the Roman Empire ever faced.
Before the battle, Boudicca and her followers had burned Camulodunum, Londinium and Verulamium. Tens of thousands were dead. Roman Britain looked close to collapse. Then, with little more than a single field army and a talent for choosing the right ground, the Roman governor Gaius Suetonius Paulinus managed to reverse the entire war in a single afternoon.
Tacitus gives us the fullest account. Cassius Dio adds drama, and perhaps a little too much theatre. Somewhere between the two lies the truth. The result was devastating. Boudicca’s rebellion collapsed, Rome survived, and Britain remained under imperial rule for nearly another four centuries.
Where Was the Battle of Watling Street?
The precise site remains unknown, which is either wonderfully mysterious or deeply irritating, depending on your tolerance for archaeologists arguing over muddy fields.
Most historians believe the battle took place somewhere along the Roman road running from Londinium to Viroconium. Several possible locations have been suggested:
- Mancetter in Warwickshire
- High Cross in Leicestershire
- Church Stowe in Northamptonshire
- Atherstone, near the line of Watling Street
- Sites near Towcester
Tacitus describes a narrow defile with woodland behind the Roman army and open ground in front. This allowed Suetonius to protect his flanks and force the Britons to attack head-on.
The battlefield was carefully chosen. The Romans needed somewhere that cancelled out the rebels’ overwhelming numbers. Suetonius found exactly that.
Background to the Battle
The revolt began after the death of Prasutagus, king of the Iceni. Rome ignored his will, annexed his kingdom, flogged Boudicca and assaulted her daughters. It was the sort of behaviour that has a habit of producing rebellion.
The Iceni rose first, then the Trinovantes and other tribes joined them. Roman settlements were attacked in quick succession:
- Camulodunum, modern Colchester, was destroyed
- Londinium, modern London, was abandoned and burned
- Verulamium, modern St Albans, was sacked
Tacitus claims that around 70,000 to 80,000 Romans and Romanised Britons were killed during the revolt. Ancient historians were fond of impressive numbers, but even allowing for exaggeration, the scale of destruction was immense.
While Britain burned, Suetonius Paulinus marched east from north Wales with the remnants of his army. He could not save the towns. He could, however, still save the province.
Forces
| Side | Commander | Estimated Strength | Composition |
|---|---|---|---|
| Romans | Gaius Suetonius Paulinus | Around 10,000 | Legio XIV Gemina, detachments of Legio XX Valeria Victrix, auxiliaries and cavalry |
| Britons | Boudicca | Perhaps 80,000 to 120,000 (Highly debated) | Iceni, Trinovantes and allied tribal warriors |
The exact figures are uncertain. Tacitus gives the Britons a massive numerical advantage. Modern historians usually reduce the totals somewhat, but there is little doubt that the Romans were heavily outnumbered.
Roman Forces
The Roman army probably included:
- Legio XIV Gemina, the core of Suetonius’ force
- Vexillations from Legio XX Valeria Victrix
- Auxiliary infantry
- Auxiliary cavalry on the flanks
Notably absent was Legio II Augusta. Its commander, Poenius Postumus, failed to join the governor. Later, perhaps realising that missing the decisive battle of the campaign was not likely to help his career, he reportedly took his own life.
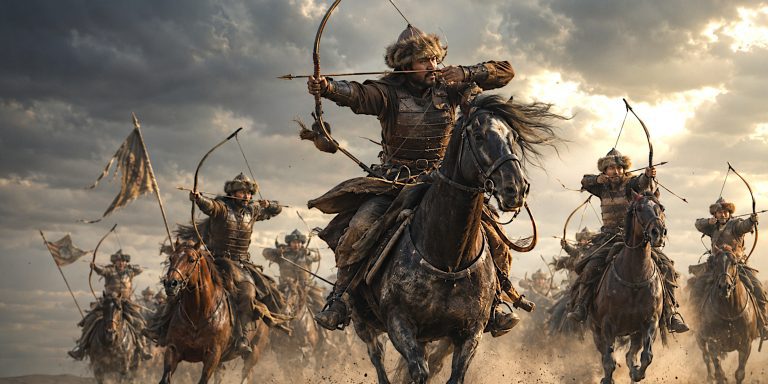
British Forces
Boudicca’s army included warriors from several tribes:
- Iceni
- Trinovantes
- Cornovii
- Other tribes from south-eastern Britain
Many non-combatants travelled with the host in wagons. According to Tacitus, these wagons were placed behind the British line so families could watch the expected victory. This proved to be a disastrous decision. Once the British line collapsed, the wagons blocked any chance of escape.
Leaders
| Leader | Side | Role |
| Boudicca | Britons | Queen of the Iceni and leader of the revolt |
| Gaius Suetonius Paulinus | Romans | Governor of Britain and commander of the Roman army |
| Poenius Postumus | Romans | Commander of Legio II Augusta, absent from the battle |
Boudicca is remembered as a symbol of resistance, but Suetonius deserves credit as one of Rome’s most capable commanders. He had served in Mauretania and was an experienced general. At Watling Street he showed exactly why Roman armies remained so difficult to defeat.
Arms and Armour
Roman Weapons and Equipment
The Roman army was heavily disciplined and well equipped.
- Gladius: The standard Roman short sword, designed for thrusting in close formation. The Mainz and Pompeii types were both in use during the mid-first century AD.
- Pilum: A heavy javelin thrown before contact. Its long iron shank often bent on impact, making shields difficult to use.
- Scutum: Large curved shield, ideal for maintaining a defensive wall.
- Pugio: Roman dagger carried as a secondary weapon.
- Mail armour: Most legionaries wore lorica hamata, a mail shirt that offered good protection without restricting movement.
- Helmets: Early Imperial Gallic and Imperial Italic styles were common, often with cheek guards and neck protection.
Roman auxiliary cavalry carried longer spears and sometimes used the spatha, a longer sword than the gladius. By the end of the battle, it was these cavalry units who turned the British retreat into a massacre.
British Weapons and Equipment
British warriors relied on courage, speed and ferocity rather than standardised equipment.
- Long slashing swords: Celtic-style iron swords, often designed for cutting rather than thrusting
- Spears and javelins: The most common weapons on the battlefield
- Oval shields: Usually wooden with an iron boss
- Daggers and knives: Used once formations broke down
- War chariots: Boudicca is said to have moved among her troops in a chariot before the battle
Many British warriors wore little armour. Wealthier nobles might possess chainmail or bronze helmets, but most fought in ordinary clothing with cloaks, trousers and a level of confidence that was, in hindsight, perhaps slightly optimistic.
Contemporary Quotes
Tacitus records Boudicca addressing her army before the battle:
“I am not fighting for my kingdom and wealth. I am fighting as an ordinary person for my lost freedom, my bruised body, and the outraged chastity of my daughters.”
Suetonius, meanwhile, urged the Romans to ignore the noise and numbers of the enemy:
“There are more women than fighting men among them. They are unwarlike and unarmed. Once they have felt the shock of our attack, they will break.”
Cassius Dio gives Boudicca a more elaborate speech, including a striking line:
“Win the battle or perish. That is what I, a woman, will do.”
Ancient speeches were rarely recorded word for word. Historians wrote them later to capture the spirit of the moment. Even so, they reveal how both sides wished to be remembered.
Battle Timeline

| Stage | Events |
| Early AD 60 or 61 | Boudicca’s revolt begins after Roman abuses against the Iceni |
| Shortly afterwards | Camulodunum destroyed |
| Days later | Londinium abandoned and burned |
| Soon after | Verulamium sacked |
| Final phase of revolt | Suetonius marches east with around 10,000 men |
| Day of battle | Romans take position in a narrow defile |
| Opening of battle | Roman pila thrown into advancing Britons |
| Mid-battle | Roman infantry advances in wedge formation |
| Collapse | British line breaks under Roman pressure |
| End of battle | Roman cavalry attacks retreating Britons trapped by wagons |
| Aftermath | Boudicca dies, either by poison or illness |
How the Battle Was Fought
The British attacked first, advancing across open ground in a huge mass. They had numbers, momentum and confidence. Unfortunately for them, they also had to charge directly into one of the most disciplined armies in the ancient world.
The Romans waited until the enemy came within range. Then they launched their pila. The heavy javelins tore into shields and front ranks, creating confusion and slowing the attack.
Once the Britons were disordered, the Roman infantry advanced in a wedge formation. Protected by shields and armour, the legionaries drove forward with the gladius. In the confined space chosen by Suetonius, the British numerical advantage became almost useless.
As the line collapsed, Roman cavalry struck the flanks. Behind the British army, the wagon train created a deadly bottleneck. Panic turned into slaughter.
Tacitus claims that 80,000 Britons were killed, against only 400 Romans. Those figures are almost certainly exaggerated, especially the Roman losses, which sound suspiciously like the sort of thing a governor might mention in his report to Rome. Even so, there is little doubt that the British defeat was catastrophic.
Archaeology
Because the battlefield has not been securely identified, archaeology has produced more clues than conclusions.
Possible evidence includes:
- Roman military finds near Mancetter and Atherstone
- Iron weapons and spearheads discovered close to the line of Watling Street
- Concentrations of Roman and Iron Age artefacts in Warwickshire and Northamptonshire
- Burn layers in Colchester, London and St Albans confirming the destruction caused by the revolt
Archaeologists continue to search for a site that matches Tacitus’ description. The most promising locations combine:
- A narrow approach
- Woodland to the rear
- Nearby Roman road access
- Evidence of first-century military activity
Until a large concentration of weapons, bones or Roman military equipment is found, the exact location will remain uncertain.
Aftermath

The defeat ended the rebellion almost immediately. Boudicca either took poison or died from illness shortly afterwards. Tacitus and Cassius Dio disagree on the details, which is usually a sign that nobody was entirely sure at the time either.
Rome considered replacing Suetonius because his harsh reprisals risked provoking further unrest. Eventually, a more conciliatory policy was adopted.
Britain remained under Roman control, but the revolt left a lasting mark:
- Roman towns were rebuilt with stronger defences
- The army became more cautious in dealing with tribal leaders
- Boudicca entered legend as a symbol of resistance
- The battle demonstrated the importance of Roman discipline and battlefield tactics
Without Watling Street, Roman Britain might not have survived. It is difficult to imagine Londinium becoming the centre of Roman Britain if the rebellion had succeeded.
Why the Battle of Watling Street Still Matters
Watling Street was more than a military victory. It was a turning point in the history of Britain.
For the Romans, it preserved the province and protected their prestige. For the Britons, it marked the failure of the largest native uprising against Roman rule.
Boudicca remains the more famous figure today, which must be faintly irritating for Suetonius Paulinus. He won one of Rome’s greatest victories, yet most people remember the woman who nearly defeated him.
Perhaps that is fitting. Battles are often won by generals, but remembered because of the people who dared to fight them.
Further Reading
M. G. Jarrett, studies on the location of Watling Street battlefield
Tacitus, Annals
Tacitus, Agricola
Cassius Dio, Roman History
Graham Webster, Boudica: The British Revolt Against Rome AD 60


