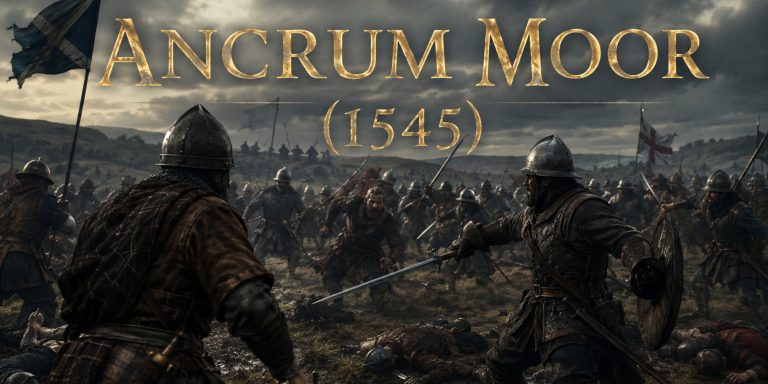
The Battle of Inverkeithing took place on 20 July 1651 during Cromwell’s invasion of Scotland. It was a sharp and brutal clash that broke Royalist hopes in Fife and opened the way to Perth. It is remembered for the desperate courage of the Highland regiments who effectively fought themselves out of existence. As a historian, one cannot help admiring their resolve while also wondering whether someone might have raised a hand and asked for a revised battle plan.
Background
In the summer of 1651, the forces of the English Parliament sought control of the Firth of Forth. If Cromwell could put troops across the water and lift pressure on his blockade at Stirling, he would force Charles II and the Scottish Royalists out of their defensive posture. Major General John Lambert led a force across the Forth, landing at North Queensferry. The Scots under Lieutenant General Sir John Brown of Fordell and Sir John Wemyss hurried to contain the landing before it could expand into a foothold.
The ground that separated them was a mixture of rising slopes, outcrops and fields. Useful if you wanted somewhere to graze cattle in peacetime, infuriating if you wished to launch an orderly defence in a hurry.
Forces
Commanders
| Side | Senior Command | Supporting Officers |
|---|---|---|
| Parliamentarian England | Major General John Lambert | Colonel Robert Overton, Colonel Okey |
| Royalist Scotland | Lieutenant General Sir John Brown of Fordell | Sir John Wemyss, Sir George Buchanan |
Troop Composition
| Army | Estimated Strength | Key Units | Notes |
|---|---|---|---|
| Parliamentarian | Roughly 4,500 | Lambert’s infantry brigades, Okey’s dragoons, cavalry troops | Well drilled professionals with strong fire discipline |
| Scottish Royalist | Around 4,000 | Highland infantry from Clan Maclean, Clan MacDougall, Clan Buchanan, cavalry under Wemyss | Brave but less cohesive, lacking the Parliamentarian depth of experience |
Arms and Armour
Scottish Royalists
- Swords: Basket hilted broadswords and backswords typical of Highland fighting.
- Polearms: Lochaber axes and spears in some companies.
- Firearms: Matchlock muskets with variable supply of powder.
- Armour: Limited armour use, often just targe shields and light helmets. Many Highlanders relied on agility and shock rather than heavy protection.
Parliamentarian Forces
- Swords: Mortuary swords for cavalry, standard infantry hanger swords.
- Firearms: Matchlock and increasing numbers of flintlock muskets.
- Pikes: Still part of infantry formations although declining in ratio.
- Armour: Light cavalry cuirasses, infantry helmets and buff coats. More consistent than their Scottish opponents who had to make do with what clan and purse allowed.
The clash therefore pitted Highland shock tactics against the organised volley fire and cavalry coordination preferred by Parliament. The result was depressingly predictable.
The Battle
The Scots attacked in an attempt to drive Lambert’s men into the sea before they could fully consolidate their position. Early skirmishing favoured neither side, but Lambert’s disciplined infantry began to grind forward. The crisis point came when Highlanders of Clan Maclean advanced with determination that would have impressed even their opponents.
Parliamentarian cavalry exploited a gap on the Scottish flank. The line buckled. Clansmen attempted to hold, but pressure and firepower overwhelmed them. The Macleans stood in a series of last stands. Tradition claims seven of them formed a protective ring around their chief, Sir Hector Maclean, and fell one by one. It is the sort of story that makes a historian double check the sources, then pause and accept that some events are simply recorded because they happened and because they deserved remembering.
With the Scottish centre collapsing, Brown’s force broke. Lambert controlled the pursuit to avoid overextension. The road to Perth now lay open to the Parliamentarian army.
Contemporary Quotes
Parliamentarian records noted the fierceness of the Highland attack:
“They advanced with such resolution as few men living have seen, yet were thrown back by steady fire.”
A Royalist chronicler captured the despair of the collapse:
“Their valour was not matched by fortune, for the ground was against them and the shot fell like rain.”
A local Fife minister wrote later, in a tone that suggests he had long since run out of patience for warfare on his doorstep:
“The day was noise, smoke and misery, and none here will forget how swiftly our hopes departed.”
Archaeology
Archaeological surveys around the Ferry Hills and the Carlingnose peninsula have uncovered:
- Musket balls of varying calibre indicating close range volleys and scattered skirmishing.
- Buckles, harness fittings and damaged blade fragments, several consistent with Highland basket hilt swords.
- Burnt soil areas suggesting where volleys were exchanged or where bodies and equipment were gathered shortly after the battle.
- Possible defensive earthworks near North Queensferry linked to Lambert’s initial foothold.
The archaeology reflects the written accounts: intense musket fire, broken formations and close quarter fighting where Highland swords were used in desperate stands.
Timeline of the Battle
Morning, 20 July 1651
Scottish forces advance from the west intending to pin Lambert’s landing before he can expand.
Late Morning
Early skirmishing begins. Parliamentarian troops form defensive lines and begin controlled volleys.
Midday
Highland regiments of Maclean and allied clans launch a full assault. Parliamentarian infantry steady under pressure.
Early Afternoon
Cromwellian cavalry turn the Scottish flank. The Scottish centre begins to give way.
Mid Afternoon
Final Highland stands occur. Clan Maclean suffers catastrophic losses. Lambert orders a measured advance as Scottish units break.
Late Afternoon
Royalist retreat becomes general. Lambert secures the area and prepares the route north toward Perth.
Seven Swords Takeaway
The Battle of Inverkeithing broke Royalist control of Fife and gave Cromwell the opening he needed to outflank the remaining Scottish defences. It also devastated several Highland clans, most notably the Macleans, whose losses echoed for generations.
Today the battlefield is commemorated with memorials and ongoing archaeological interest. It remains a reminder that bravery, however intense, rarely compensates for a well positioned enemy with superior organisation. A painful truth for the Scots, and a gift for historians who prefer their lessons plainly stated.
Watch the documentary: